
Firstly, before even starting anything on illustrator I named my first layer "template"- and on this layer I placed my townscape image that I planned to work with (an image that I took myself) and changed the setting of the image "template" and reset the brightness on the image so that I could draw over it and remove it when finished- making it easier for myself to draw with the computer. I then locked the layer as you can see on the image to the left so that I don't get confued with the layers.
+creating+layers+1.png)
+layers+1.2.png)
+pen+tool+menu+2.png)
+started+to+use+pen+tool+1%E2%80%A6+3.png)
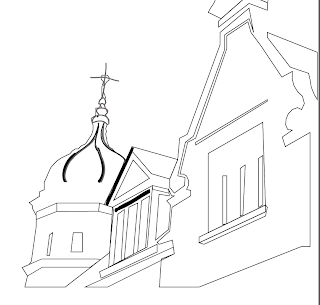
 This is an example of the start of the illustrator drawing- as you can see you have to draw around whole shapes like this- which is easy once you get used to it... Its just the simple outline before adding any detail at all.. I think the pen tool is very handy asd it requires no real skill- the programme does all the work for you.
+later+on+on+pen+tool.png)
The images above are examples of my pen tool work- mainly outlining the larger shapes and getting an essence of the real image underneath... It was really hard work getting the smaller shapes to the right size and shape so most of them are wonky or mis-shapen and can't be fixed because the lines get confused when they get to close to other points/anchors... I will remember that for next time..
+blob+tool+screenshot.png)
Blob tool:Then we started learning about the blob tool (3rd one down on the image to the left) which allows you to paint in neater shapes... for example if you wanted a curved line you would draw your best attempt and the programme will edit it so that the edges are sharper and more defined and resemble a curved line more... it is a very easy tool to use.

Here I edited the blob tool to the size that suited me best, the smoothness, shape size angle and roundness .. I did this afew times when the brush needed to be smaller to paint the smaller areas.
The image below is the menu colour for the blob tool, I changed it to a grey colour part way through my drawing to add some shade to the mroe defined lines..

+adding+blob+tool+and+colours.png)
I could have done better but the template was too faint and I couldn't see any finer detail....
+I've+left+this+image+due+to+it+being+boring.png)
It's not very detailed and I didn't use the blob tool much but it has a strange quality about it and I can't tell whether it's good or bad...
This is what my drawing looks like so far without the template behind....... Before and after...

 Here I have created a new layer for 'brush work' which is the new tool I will be using to add more detail to my drawing. This way I can easily remove all brush work if I decide I don't like it.
This is what my drawing looks like so far without the template behind....... Before and after...


 Here is the menu that shows the different shapes and styles that the brushes creates to give you an idea of what the brush stroke will look like which I think is a really good idea. As you can see on the image behind I have decided to use the watercolour brush to add this unusual effect to the dome... It's abit out of the lines and oddly shaped in places but I like the way it looks- it gives it a more 3d effect and it was an easy brush to use.. I quite enjoyed using this material....
 Here is another example of my brushwork- this time I have chosen 'charcoal' to add abit of shade and tone onto it which I found quite easy to use, erase and play with... It's a creative tool that can be used for many purposes and at the start I was only experimenting with it but it looks so nice I've decided to keep it and add it onto other various places...
 And here is the menu of the different shapes and styles of charcoal that can be used I experimented with quite afew of them and used others simply because they were smaller and created a more detailed effect... this menu made the tool easier to use as you can click and use straight away which I think is brill.
Here is a screenshot of my drawing so far, it's not very detailed, not very accurate and I don't really like some of the effects that I have used but I think the drawing would look too plain and I wouldn't like it... I think this image could look better but I would have to start all over again...

 here is the menu for the tool brush, it'f for all the main settings for it such as brush scale size, strength of tool, direction as you can see it's very useful if you want a specific brush type. I didn't really need this menu but it was good to know that if I did want something specific then I would know where to look.


No comments:
Post a Comment